Saturday, June 30, 2012

First Glittery Nail Mail

Good evening glittery polish world! So today I got my first ever nail mail from my friend Katie in my a capella group. It was glittery, blue, purple, and she claimed it would be like 'a galaxy' on my nails. And boy was it! Introducing Fashion Bug's Twilight Blue Sparkle as glittery tips!


So using the wonderful tape method, I made these glittery tips! It took about 2 coats per nail, and then I removed the tape after about 15 seconds. Twilight Blue Sparkle was a little thick and had a strong odor, but the glitter factor was amazing! Katie knows me well!  Here was what it looked like!


So then I used a silver striper from 5 Below for some definition, holding the brush still and rotating my finger. Then I finished off with a coat of Sally Hansen's Dual Strengthening Base and Top Coat! I definitely liked this mani. Lots of glitter, and it was from a friend. Fashion Bug is going out of business though, so if you want one, run there!  I give this a 9/10 on glitteriness, 7/10 for application, and a thank you to Katie!


Friday, June 29, 2012

Zoya Surf Tips

Good evening fans! So today I decided to try my free shimmery Pinterest Zoya Surf Trio in Kimber, Myrta, and Zuza! I also tried my hand at free hand tips, and this is what I came up with! 


So here's how this goes! These polishes get nicely opaque after only 1 coat, so I used 1 of Zuza for the base of this design, and here's what it looks like :)


After that dried, I made the tips with Kimber and then Myrta on my ring finger. Then I used my 5 Below Silver Striper for the lines. Perfect! Of course my other hand was a bit harder, but hey, with practice they'll both look awesome! Woo! I like it. Zoya is a little thick for me, but other than that, this shimmery is a 7/10. Not bad. Think you'll try this? Good night glittery polish lovers!


Wednesday, June 27, 2012

I Believe in Fairies, Purple, and Glitter!

Good afternoon dear glittery polish lovers! So I decided that today I'd do my nails before I went to work, and I picked out Avon's Loving Lavender (a creme polish, I know, but wait!) and Whimsical by Pam's I Believe in Fairies! This was truly I glorious combo, and the how to will be next!


Beautiful isn't it? Let's get on to how we achieve such glittery perfection! Well this is how it goes. I decided I really wanted a lighter purple on under IBIF so that I didn't need too much to make IBIF opaque, so I went with Loving Lavender. Now I went REALLY slow (about 30 sec/nail) in order to make sure I got nothing on my cuticles and had uniform application. So far, I think this is the least messy application I've ever had! I only needed one coat, as one needs with most Avon polish, and I loved it! I could definitely see myself wearing this on its own :) It also dried relatively quickly, as most Avon polishes do. It was dry by the time I had finished one hand. 


So then we come to I Believe in Fairies. I stumbled upon Pam's little bottles of glitter while on a page for Llarowe, the shop that sells all kinds of polish. I immediately fell in love, for it was a dark purple glitter jelly base with silver stars, silver, blue, and pink glitters. I knew I had to have it! It def reminded me of Stockata, my female a capella group. For we are purple, and the rising stars! I used 2 coats of IBIF. It went on beautifully, and I just had to shake up the bottle in order to get a star or two on my brush! This also dried relatively quickly. And how could I not love it? It makes me think of Tinkerbell too. Then I used just one coat of Sally Hansen's Dual Strengthening Base and Top Coat.  Definitely a 10/10 for glitter, and a 9/10 for application. I can't wait to get more of Pam's polishes!

Taken with flash to show the lavender highlight
***All Whimsical by Pam polishes come with an adorable black bow on the bottle, a thank you card, and directions on glitter removal. For advice on how to do that, check out my glitter removal post. These polishes can be bought for $10 a bottle at  https://www.facebook.com/whimsicalideasbypam ***


Sunday, June 24, 2012

Dots and Girly Bits

Good evening again glittery polish lovers! So yesterday after removing that pesky glitter, I decided I'd try out my Girly Bits January Morning along with a dotting design idea I got from I Feel Polished! So what you'll need is Sinful Colors Snow Me White, Girly Bits January Morning, Avon Ruby Slipper, and OPI The Flowers are Blue-Ming! along with some large, medium, and small dotting tools. Here is the finished result!


Here's how you make this cute little red, white, and blue dot design! First I used one coat of Sinful Colors Snow Me White, and then I put 2 coats of Girly Bits January Morning on top. While it went on well, better than Sinful Colors Smoking Hot that it reminded me of, it would take about 5 coats to be as opaque as I wanted, so it is best to layer this shimmery polish over something! Here's how it looked.


After that dried, I picked out one of my larger dotting tools and dotted all my nails with alternating blue and red dots. This was the result:


Then I used my smaller dotting tool to put white dots in all of those dots. Finally with my smallest dotting tool, I put tiny red and blue dots inside the white ones. I then got a ring or target effect. I really liked it! Easy, simple, nice, and cheaper than a salon!  Enjoy glitter lovers!


**Girly Bits can be bought on shop.llarowe.com for $12 a bottle**


Saturday, June 23, 2012

Glitter Removal as Easy as 1, 2, 3!

Good evening glitter lovers! Love glitter but hate using the polish because of the difficult removal? Does it take you over an hour to remove all that glitter with remover? Do you pick at the glitter but hurt your nails? Then welcome to *drum roll* the tin foil removal method! Here's what you're gonna need:


1. Acetone or non-Acetone Nail Polish Remover
2. Scissors
3. Tin Foil
4. Jumbo Cotton Balls 


So remember that wonderful Lynnderella I had on? Cauldron Drippings? Well because I used more of its glitteriness than the average person, I knew it would be an extremely bad experience getting it off. However, I heard about this method, so here I am to share it with you!  Take a cotton ball and soak it in remover (like 2 shots of remover) and press it onto your nail. Then cut a piece of foil large enough to wrap your finger and cover the tip of your finger. Do this for one hand at a time and you'll get this:


The key is to wrap it tight enough, so no air can get in. What does air do when you have some remover handy to clean your dotting tools or your cuticles? It dries up! So this prevents the remover from evaporating!  Let your nails stay wrapped for about 7ish minutes, and when you go to remove it, firmly grasp where the cotton ball is, and pull it off with the foil.  There may be some residue left, so scrub with another cotton ball with some remover. It will come off easily since the nail has been soaked.  Get the glitter off quick before the acetone dries and the glitter sticks!  This really does work, even if you think too much glitter is left when you unwrap. It comes right off with a light scrubbing of a cotton ball. Then you get this! Any questions, just ask! Now enjoy glitter polish! :)


Thursday, June 21, 2012

Lynnderella: Is it All it's Cracked Up to Be?

Good evening glittery polish lovers! So today I finally tried my much anticipated Lynnderella in Cauldron Drippings that I won from Set in Lacquer's 2000 Follower Giveaway! Now there's A LOT of hype over these. They're uber glittery. $16 a bottle. VERY HARD to get. And now there has been some sort of drama, so Llarowe will not be selling them anymore. Are these worth it? Let's find out! Here is Cauldron Drippings in 2ish coats (more on this later) and 2 coats of Sally Hansen's Strengthening Base and Top Coat.


Since everyone tends to do their Lynns with a base coat of orange or something when dealing with Cauldron Drippings, I decided to be different and just do the 2ish coats. I say 2ish because, well, the second coat wasn't really a coat. I had to 'dab' at the places I wanted glitter to be. That was a royal pain. The glitter was different colors (orange, gold, purple, green, black, silver) and shapes (squares, bars, dots, hexagons) and I even got lucky with a nice large silver hexagon on my pinky finger. Was the only one I found!


So the polish was very goopy no matter how much I shook it, and if I may say, there was TOO MUCH GLITTER. Yes I said it. Can you believe it? So much that it could get clumpy and the bars sometimes curled. And too much means a pain to apply. I like glitter polishes that aren't a pain to apply AND look good. Lynnderella's Cauldron Drippings just looked very glittery.


So all in all, I give Lynnderella's Cauldron Drippings a 10/10 for glitter, but a 5/10 for application, and then a 5/10 for price.  There are other great glittery polishes out there to satisfy your craving, like Pretty & Polished and Whimsical Ideas by Pam. And with all the drama going on with Lynnderellas now, heck, I'll keep it for the glitter, possibly Halloween, but I don't think I'll EVER buy one. Yes they are pretty, but to me they have too many cons. More Indie glitter polishes are ordered, so I shall review/wear them soon! Buona notte!


Tuesday, June 19, 2012

Star Light and Stamping

Good afternoon polish lovers! Today one of my favorite old sparkly eye shadows was breaking up, and I had some cheap top coat, so I thought, why not? Today I shall make my own polish! And I did! Here are some pics of my new/first polish, Star Light!


Star Light with a Flash to Show the Sparkle


So I used 2 coats of Star Light to make it as opaque as I wanted. It's a bit sheer, so you could even use it as a glittery silver top coat if you wanted to!  My formula was a little gritty, but after shaking it up some more, it finally was perfect.  I did bump my fingers on the table, so they may be a tad messed up, but I was happy with my first polish!  Then I decided, hey, I'm gonna stamp! So I used Warpaint Beauty's Purple Haze and my Salon Express stamper to stamp on some pointed purple stars.


*Though I did not make Star Light with the intention of selling it, if you do wish to have a bottle, post on my facebook page, https://www.facebook.com/GlitteryAndPolished or email me at princessishyama@verizon.net and we can work something out. Thanks!*

Sunday, June 17, 2012

Minnie Mouse Inspired Nails

Good evening polish lovers! So being a lover of glitter AND Disney, I finally decided it was time to break out my dotting tools for what I originally bought them for: Minnie Mouse nails!  Here is my Minnie inspired mani, with a step by step explanation!  I used Avon's Ruby Slipper, Wet N' Wild Shine's White French Creme, and a black Sinful Colors striper!


So on to how it was done! First I started off with my favorite red polish, Avon's Ruby Slipper! As an Avon Representative, I had to try it, and it's a sparkly red that goes on with just one coat! (If you want some of their stuff, feel free to email me at princessishyama@verizon.net :) ) 


After this dried for about 3 minutes (yes, that fast! Avon rules!), I took out my biggest dotting tool to make random white polka dots on every finger but my ring finger. On my ring finger, I used the same dotting tool to make a red dot inside a black one for the center of the bow, then used a black striper to make the bow shape. Just go slow, and don't get too much polish on your striper. Then I used a smaller dotting tool for the white polka dots in the bow. Then with a quick stroke of Sally Hansen's Strengthening Base and Top Coat, I was done! I love Minnie Mouse, and this design is one of my faves!  And this Avon polish had a very nice shimmer. I give it a 8/10. Until next time!


*Don't forget to comment and share with your friends!*

Friday, June 15, 2012

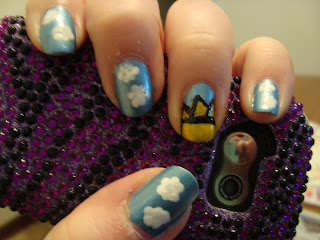
Cloudy with a Chance of Sunshine

Good afternoon polish lovers! So today I did a design that fit the weather! Blue skies, some clouds, and a hint of sunshine!


So to begin, I used just one coat of Essence's Gleam in Blue! The brush gave very smooth and easy application, and the shimmery blue required only one coat to be as opaque as I wanted! Again, the cheap $1 polish that is Essence never ceases to amaze me!


After that coat dried, I used a dotting tool along with Wet N' Wild Shine in White French Creme for the fluffy clouds. I then used Sinful Colors in Let's Meet to do a yellow tip on my ring finger and then a paint brush to do the sun's rays. Warning, don't use too much yellow. It may not look dark enough, but when it dries, coverage is perfect! I then used use a Sinful Colors Black striper to outline the sun. And ta-da! There it is! I didn't use a base coat, but I did use Sally Hansen's Dual Strengthening Base and Top Coat for the top coat. There you have it! Cute and original! As usual, I'd like to rate the essence as 10/10! Just awesome. Until next time!


Thursday, June 14, 2012

Crackle Galore!

Hi guys! So I decided I'd do crackle tips with full crackle on my ring finger for a little pop! So this is that spark of originality! I used O.P.I.'s Pink Shatter they sold for breast cancer awareness and Wet N' Wild Shine in White French Creme.


I used 2 coats of the white and let it dry for 10 minutes. Then I freehanded the crackle tips and did the one coat on my ring finger. While it looks reddish in the picture, it is actually a very dark pink. More crackles will be coming!


*Warning* Do not use tape to make your tips with this polish. No matter how much it dries, some of the white WILL come off because it is so cheap.  I will be investing in a better white polish, as I suggest you guys do as well!

Wednesday, June 13, 2012

HITS Holographic Dionisio

Hello hello! Sorry for the wait between posts! I had to wait for some sunshine for this one! And here it is! HITS holographic nail polish in Dionisio!


This stuff is amazing! I used 2 coats, and it was plenty! The brush was easy to use for application, but beware, it smells more like acrylic paint than nail polish, and make sure to let a bit drip off your brush before application! When it goes on, it's dark purple with silver micro glitters packed throughout. When it goes under sunlight, bam! A shimmer of glitter and rainbows emerges! Inside under lamp light though, you get a muted rainbow effect. 


So overall, because I love purple since it is my a capella group, Stockata's color, and I love sparkle and effects, this polish is a 10/10 for me! It really was great to look at them in the sun! I would definitely invest in more holo polishes if I had another $10! HITS can be found on shop.llarowe.com for $10 a bottle, pretty much as cheap as holo polish gets. Until next time! Enjoy more rainbow goodness!


Monday, June 11, 2012

A Nail Junkie's Glitter

Hi guys! I was away for a bit with the LYFE Christian Women Conference in PA this past weekend, but now I'm back, and eager to share the glittery polish I wore there!  Short and sweet. I used 3 coats of Sinful Colors in Nail Junkie and a top coat!  I may have done one extra coat to make it a bit darker, but this is what I got. 


Now me loving glitter, I loved this polish! It was very glittery, but not so glittery that it was bumpy on my nails. However, I really had to let a lot of polish off the brush before putting it on my nails, for it was very thin and slid down the sides of my nail into my cuticles if I put too much on.  Overall, I would use it again, and just be careful to get as much off the brush as possible before application. For now I say 7/10 for application and 9/10 for glitter!  More to come!


Tuesday, June 5, 2012

Fallin' In Love With Music

Hi guys! I did this quick cause I had to fill out a job app, but here they are! Music note nails! I was going to do watermelons, but I was thinking of my all female a capella group at college, Stockata, was singing my soprano 2 part to Fallin' on the radio, and thought, why not?


So I used Sinful Colors in Smoking Hot, a black Sinful Colors striper, and white/black Wet N' Wild Shine polishes! I also used the biggest dotting tools I had. Then humming some old Stockata arrangements, I set to work with everything I needed!


After 2 coats of white to make it opaque, I used my striper to draw 2 lines to be part of the 'staff.'  I rotated my finger and kept the brush as still as my shaky hands would allow! Then I used my biggest dotting tool to make the ball of the notes, and then my black striper for the accents. As always, I finished with Smoking Hot for some glitter and done! A tribute to Stockata. Hope you enjoy Megan, Katie, Cynthia, Rachel, Robin, Devon, Gabby, Erin, Alison, and Dana!  Ba dum di bum! 


*thanks to cutepolish for the design idea*

Saturday, June 2, 2012

A Flower for Mom

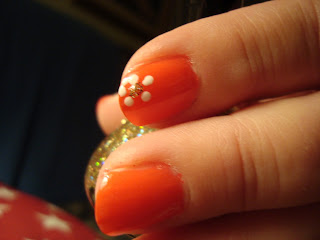
You're lucky! Two posts in one day! My mom saw my flowers and decided that she'd like them too. She just wanted them on her pointer finger, so this is how it turned out.


Color used was my mom's favorite, Avon's 30 Second Speed Dry in Mambo Melon. And people, it really does dry in 30 seconds! The polish is dark enough for only one coat to make it opaque. Just for a touch of sparkle and flare, I used my dotting tool to make 5 white dots for the flower on each hand, and then I used Funky Fingers in Golden Coast for the middle of each flower. Enjoy another even simpler unique glitter flower design! Good night! 


(With flash: Mom did the Mambo Melon, I just did the flower)

Flowers With A Touch Of Sparkle

Good afternoon glitter and polish lovers! A friend suggested that I do something pink for early summer, so I set to work! While tips were the original idea, the brush on my one KleanColor polish broke! So instead I dug into my new Sally Hansen HD Colors and came up with this cute flowery design!


Really cute right? I absolutely love them! To make this design, I used about 4 coats of Sally Hansen HD Color in LCD. It was a very sheer sparkly pink, so it needed enough of those coats to become as opaque as I wanted. Application was smooth though, so seems we've found another good glitter polish that goes on without a hitch!  Without the flowers, my mani looked like this.


So I whipped out my dotting tools after this dried and put 5 dots for each of the 2 flowers on each finger with my Wet N' Wild Shine French Creme White polish.  Then I used Sally Hansen's HD Color in Spectrum for the touch of glittery blue in each flowers center.  I used 2 coats of Spectrum to make my blue dots more opaque.  In the end, I made a cute little mani out of 2 new glitter polishes and an old white I had! Glorious! I say 9/10 for the glitter factor.  If you don't have a dotting tool, feel free to use a toothpick or ball point pen!  Have a glorious day and enjoy the flowers, glittery or not! :)