Sunday, July 29, 2012

Julep Bombshell Intro Polishes

Good afternoon glittery polish lovers! I recently became a Julep Maven, where you can get your first intro box for a penny buy using the promo PENNY. Great right? I don't have to get another box again if I don't want too! I got the Bombshell box, and in it were Natasha and Oscar. They went together perfectly, and my mani looked beautiful!


Now look at that glitter and shine! Of course, it all starts off with a great creme base, which is Julep Natasha. It was said to be a coral, but for me it was more of a rich, dark orange. The formula was wonderfully smooth, and the brush was just as good! My application looked pretty darn clean, even with nubby nails! I only need 1 coat for full opacity over my Sally Hansen Double Duty Strengthening Base and Top Coat. Look at the shine it had on its own!


After that dried, which didn't take long at all, I whipped out Julep Oscar, the extremely gold shiny glitter that looked like it would go perfectly with Natasha. I had plenty of glitter in one coat, and it was not difficult to apply at all! It also had excellent coverage, so I only need a swipe of my brush on each half of my nail. Then with a coat of Seche Vite, any slight feeling of grittiness from the glitter was erased! I give this overall mani a 10/10 for application and a 9/10 for glitteriness. Just look at the glitter and shine! This was my first experience with Julep, so I know my America polish that's hiding in my untrieds will be wonderful down the road as well!


Friday, July 27, 2012

Funfetti for my Birthday!

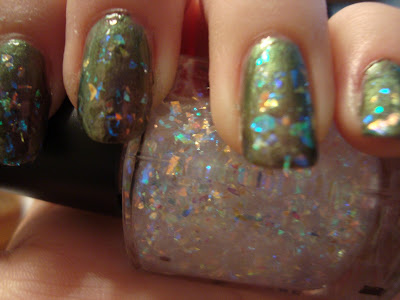
Hello Glittery and Polished fans! Today is my birthday! I'm 19 and ready to get back to college in August! Before that though, time for another great indie polish!  Today I bring you Funfetti from 365 Days of Color. This was originally to be a mini bottle, but she upgraded me to a full for free! Woo! On to the swatch! This is 2 coats of Funfetti with 1 coat of Seche Vite.


Lovely yes? Funfetti is true to its name. It has multicolored glitters in a creamy white base that remind me exactly of funfetti cake!  There are bar, hex, dot, and square multicolored glitters. This really pops, and all of the preschoolers at my job loved this today! Of course the teachers did too ;) It was relatively easy to apply, despite the glitter, and I loved the pastel look the glitters had. Very nice!  The bottle was neat too! It was a thin circle, and it was great for doing nail shots! Definitely one of the more interesting bottles of seen!  This was definitely a great bday mani! I give this polish an 8/10 for application and an 8/10 for glitter! 365 Days of Color really outdid herself with the polish and her customer service!


***365 Days of Color Polish can be bought at her store link here: http://www.365daysofcolorpolishes.com/***


Thursday, July 26, 2012

Which Blue is You?

Hello hello! Welcome to a little something different. Today I took all of my shimmery/glittery blue polishes and did a comparison of them! Now you can see what blue is you and truer than true! Here we go!


From thumb to pinky: Sally Hansen HD Color in Spectrum 2 coats, Sinful Colors in Midnight Blue 1 coat, Hot Topic Warpaint Beauty in Galaxy 2 coats, OPI in The Flowers are Blue-Ming! 1 coat, and Zoya in Song 1 coat


So to me, Spectrum seemed to be more of a blue green and a bit sheerer than the others, as is usual with the Sally Hansen HD collection.  Very glittery though! The OPI was the glitteriest out of them all, and had excellent application in just 2 strokes because of its wide brush. Galaxy was sheer but the 2nd glitteriest! Very nice sparkle. This one didn't have the red glitters that the OPI had.  Then the Zoya and Sinful Colors were the darkest. The Zoya just seemed to have a tad more shimmer, and a slighter darker blue base. So what do you think? Which blue is you?

Monday, July 23, 2012

Bumble Bees and Flowers Galore!

Good evening glittery polish lovers! Today I bring you a cute and easy nail design that's perfect for spring or summer! With bumble bees and flowers, here is my cute mani!


Here's what you need:
  • Dotting tools and a black striper
  • A white polish for the flowers and eyes (I used Sinful Colors Snow Me White)
  • Coral and blue polishes for the flowers (I used Julep Natasha and Sinful Colors Midnight Blue)
  • A yellow polish for the base (I used Sinful Colors Let's Meet)
So first I started off with 2 coats of Let's Meet, a nice shimmery yellow. The yellow isn't insanely bright, but is still a nice softer yellow. Application was great! Just be sure to let enough drip off your brush! Here it is topped with one coat of Seche Vite for shine and to aid in the drying process!


Then I used my black striper to draw the bumble bees. I drew an oval, made the bee stripes, drew a stinger, and then did some half ovals for the wings.  After the bees were done, I put my dotting tools to work to make the flowers and the eyes of the bees. Now Julep Natasha is a coral, but on the yellow it looked orange. I liked it! And I used my new Midnight Blue for some of the flowers. My how pretty my flowers turned out! I give this overall mani a 6/10 for glitter (there's more shimmer than glitter) and a 7/10 for application (it's easy, but it took about 20-30 min per hand).  What are your thoughts? Hope you enjoy and don't confuse too many bees!


**Sinful Colors is on sale for 99 cents at Walgreens this week!**


Sunday, July 22, 2012

Equestria Collection: Mare of the Moon and Hoof Wrassle

Good evening glittery polish lovers! So today I bring you 2 of Rainbow Honey's polishes from her Equestria collection: Mare of the Moon and Hoof Wrassle! The polishes are based on the new My Little Pony. While I personally am not a fan of My Little Pony, I am a fan of these glittery polishes! First up, I have my favorite, Mare of the Moon, with 2 nice coats of glittery goodness!  


Mare of the Moon was absolutely everything I dreamed it would be! It's an indigo blue polish with tons of micro silver and purple shimmer, silver/blue hexes/dots, and silver crescent moons! Now I've heard the crescents required tons of fishing from the mini bottles, but in this full bottle, it was marvelous! Application was also very smooth, much better than Hoof Wrassle. I give this one a 9/10 for glitter and an 8/10 for application. Isn't it pretty? I even got 2 crescents on my thumb!  Of course for extra shine, I used 2 coats of Seche Vite. 


So up next is Hoof Wrassle! This one, while not my favorite of the 2, was still loved! It would be perfect for Halloween! Even over black! This one is 2 coats as well, without Seche Vite. This was done to show how it stands on its own.


Hoof Wrassle is an orange base with all kinds of orange, gold, red, and silver hex, square, and dot glitters! This one was thicker than Mare of the Moon due to all the glitter, so it was a little harder to apply, but I finally got 2 coats down. This one did not have the amount of micro shimmer that Mare of the Moon did, but it was still a very pretty glittery orange. I give this one a 6/10 for application and a 8/10 for glitter! I love my first Rainbow Honeys, and I'll def order from her again soon!


**Rainbow Honey's polish can be ordered from her site her. Free shipping until 7/25/12! http://www.rainbowhoney.com/***


Saturday, July 21, 2012

50 Likes Giveaway Bash!

Hello there Glittery and Polished Lovers! So I finally got to 50 likes, so as promised, here is my giveaway with an Indie polish in the mix! The prizes are Girly Bits in January Mornings, the Zoya Pinterest Trio in Zuza, Myrta, and Kimber, and OPI in Nothing Mousie Bout It! Here are some pics!


***So rules. Open to US contestants only. Contest begins 7/21/12 and ends on 7/28/12 at midnight. Winners will be notified via email and have 48 hours to respond with their mailing address, or a new winner will be chosen. Each person will win one of the prizes!  Enter via rafflecopter below!***
a Rafflecopter giveaway


Purple Birthday Swatchathon!

Good afternoon glittery polish lovers! As the name says, welcome to a glittery purple birthday swatchathon! I got a very nice bday nail mail from Heather at I Feel Polished, so today I'm going to share as much of it as I can with you! On to the swatching! First is Zoya Zara, a light purple polish with gold and pink shimmer. Formula was wonderfully smooth and not too thin. Way better than Zoya mini bottles! I used 2 coats to reach opacity. I give it a 9/10 for application and a 7/10 for glitter. I love this color!


So glittery and purple! I absolutely love this, and it has the perfect balance of color and shimmer. After that, I found the purple striping tape that had also come with the polishes. I have little to no patience though, so I only did it on 2 fingers. One day when I have more time, I'll def utilize it, but for now, here's what I got.


Then I went, hey, Sassy Pants by Amy's Nail Boutique would look perfect on top of Zara! I pulled the striping tape off and put one coat of Sassy Pants over Zara. The light purple base was a perfect fit, and the many silver/purple shimmery glitters made it even more wonderful! There are also red, blue, and green square glitters in the polish as well! And may I say, that was one of the smoothest indie glitter polish applications I've had! This polish gets a 9/10 for application and a 7/10 for glitter!


I then moved on to the darker purple in the box, Dream On by Sinful Colors. And the song played in my head to! Ha! I was confused by the application of this polish at first. It was drying much too fast I thought. My application was awful!  And then boom! I looked at my first dried nail. It was matte! Woah! My first matte, and it was by Sinful Colors! I actually liked it! No glitter, but very nice color! Only 1 coat was used for the swatch.


Finally I moved on to the custom holographic top coat Heather made for me. I'm saving the last glittery NYC polish she sent for a rainy day :) She used some special powder to make the holo top coat, so now I can make anything holographic! I put one coat on top of Dream On, and boy, was it pretty! Some holos look kind of blah and not too glittery when they're not in the sun, but this one looked like silver glitter! And in natural and artificial light, why, it was simply rainbowy! I love all of the polishes she sent, so you should def go visit the I Feel Polished page on facebook!  She deserves tons of love!  https://www.facebook.com/ifeelpolished


Wednesday, July 18, 2012

I'm Covered in Diamonds!

Good afternoon glittery polish lovers! Afternoon. Can you believe it? I had time to do my nails BEFORE the sun went down. So as I was taking inventory of my polishes last night, I found an Essence, Where's the Party?, that I'd forgotten to use! And with a Color Club in Covered in Diamonds, I had to use them both! Here's my nails, and I do feel as if I've been covered in diamonds!


Let's get this awesomeness started! So to begin, I used 1 coat (yes 1) to get Where's the Party? opaque. Essence is known for smooth application, incredible brushes, and needing only 1 coat, all for $1. And there's some shimmer too!  Now this polish shifts from a darker green to a fuchsia depending on the light and what angle you look at it from. Here's a few pics of that awesomeness!


Looks pretty awesome by itself right? I loved it! It was just a little bit streaky (which has never happened to me with Essence polishes), but I'm guessing this is because of the shifting color.  After that, I decided I'd put a special untried glitter polish on top. Covered in Diamonds by Color Club! It has shreds of iridescent rainbow glitters in a clear base. Love love love! However, this was very thick,  so I suggest wiping the brush on the neck of the bottle a few times. The final product was beautiful after being topped off with a coat of Seche Vite! So many colors, and so much glittery goodness! I give overall application a 7/10, and overall glitter an 8/10.  I'm glad I found such a nice glitter polish to top off any future mani!


Monday, July 16, 2012

Link and the Triforce

Good evening glittery polish lovers! So for a very long time, my favorite video games of all time have been anything Legend of Zelda. Is the music playing in your head yet? I finally got the right green polish, and wella! My Link and the Triforce nails!


Very nice yes? Fit for the Hero of Time? I think so! Off to the how to!  So first I started off with 2 coats of Sally Hansen HD Color in Resolution. It was  little streaky, but the second coat nearly fixed that.  It's a much more Hero of Time green than the pictures show, and it's a shimmery jelly to boot! Delicious! 


Then I used Funky Fingers Down to Earth, a shimmery gold, to paint the Triforce. To give it more definition, I outlined it with a black striper. Of course I needed more glitter to give it a little something extra, so I used my new/first Hot Topic Black Beauty polish in Party Action, which has nice multicolor dot and hexagon glitters. And it comes in a skull shaped bottle. Cool much? After a coat of that on all my nails,  I topped it with a coat of Seche Vite for quick drying and shine. I give Party Action a 6/10 for glitteriness, and the overall mani a 7/10 for application!  Now Link is ready to go get that Triforce, and you are too with this fun video game inspired design!


Sunday, July 15, 2012

A Friend to Experiment With

Good evening all! While I may not have had time to do my nails, last night I did my friend Kiersten's! She was visiting from PA, so I thought, hey why not! As long as it wasn't pink she wanted it, so I did a simple flower mani made with a dotting tool and some awesome polishes! I apologize for the messy application. While the flowers were nice, the base was slapdash because we were rushing to be done before we passed out from being at the beach! And now to a how to!


Nice right? Well here's how it goes. I used Sally Hansen Hard As Nails in Flirt, which I thought would be a dark purple. With the flash and in some light, it looked reddish! Woah! My only problem with this is that it was a little too thin, and that made it a slight pain to apply. What I thought was a perfect amount of polish was actually too much! However, it dried quickly, which was a plus. After that, I used one of my smaller dotting tools to use a shimmery gold polish from Funky Fingers called Down to Earth. Then for the centers I used Sinful Colors Snow Me White. Gorgeous! My friend loved this simple, slapdash, design. Gotta love Kiersten! With a quick coat of Seche Vite, it was dry and shiny! I don't know if I will try this Sally Hansen line again, but I def suggest her other polishes! I give this overall mani a 5/10 for glitteriness and a 7/10 for application. Enjoy and good night! Thanks to Kiersten for being my experimentee. :)

Friday, July 13, 2012

No Girls Allowed

Hello hello! Buona notte! So I got my Avon shipment today, and I had made enough profit to order something for myself for once, so I got a new Nail Pro+ Enamel in Starry Sky, a sequin silver. I also had No Girls Allowed by Mrs. P's Nail Potions still sitting in my untrieds, so I put them both on, and this was the result for my beach day tomorrow!


Alright, let's get this started! So Avon recently reformulated their polish to make it stronger, last longer, and make the glitters glitterier, so I was able to snag something I've wanted for a while, a sparkly, sequin silver called Starry Sky. I let 2 drops off the brush, and used only one coat to get it opaque. The formula was slightly thicker than I expected, but that only meant I had to use both sides of the brush for application. This is definitely a new favorite color/base. 


Oh my! What glitter and shimmer! A perfection glittery silver! I could actually see myself wearing this alone with no design or indie on top! So then I moved on to No Girls Allowed. I found this woman's polish via her post on Llarowe, and I realized what pretty glitters she had, and she's not widely known yet! Best to snatch it up while I can! I waited for her etsy shop to open, pounced, and earned my spot as her first and most enthusiastic customer!  No Girls Allowed has blue and silver bar glitters, blue and silver dot glitters, and a few blue and silver shred glitters in a clear blue base. Paired with Starry Sky, the glitter is wonderful! I did have to shake No Girls Allowed a bit because the bar glitters settled, but the formula was great! 2 coats was all I needed! Then I topped it with a coat of Seche Vite for shine and a quick dry. I give Starry Sky a 9/10 for glitter and a 7/10 for application. For No Girls Allowed, I give it a 8/10 for glitter and a 9/10 for application. Bree is definitely great at nail potions!


*Mrs. P's Nail Potions can be bought from her etsy store at http://www.etsy.com/shop/MrsPsNailPotions *


Wednesday, July 11, 2012

Black Hole

Why good evening glittery polish lovers! So finally after work, the beach, and sunburn, I've got a new mani for you! Ever heard of Black Cat Lacquer? If not, you need to try out her indies, and my first of hers is Black Hole!


Let's get this glittery mani how-to started! So a while back I got 2 of the OPI Minnie Mouse Collection, and finally used the magenta jelly, I'm All Ears. It's a magenta pink jelly bases with tons of silver shimmer. It's a little sheer, so I used 2 coats to reach the opacity I needed. OPI brushes are a little wide (which means I almost always swipe my cuticles), but the color went on wonderfully!


So my friend Heather who does the blog I Feel Polished, pointed me to Black Cat Lacquer. She was having a 20% off promo, so I figured I could try a bottle. I picked Black Hole. It has black/rainbow iridescent diamond glitters, silver dot glitters, and a black jelly base. While it was a little bit thick due to the pigment and amount of glitter, it went on fantastic. The polish translated wonderfully from the bottle to my nails. The rainbow glitteriness from the diamonds was divine! I'd def try one from Black Cat Lacquer again. Just remember, try not to put too much on your nail, or the black base will build up! I give this a 8/10 for the glitter, and a 6/10 for application. It was a bit thick, but I powered through :) 


*Black Cat Lacquer can be purchased for $10 a bottle at her etsy store http://www.etsy.com/shop/BlackCatLacquer?ref=seller_info*

Monday, July 9, 2012

Zoya Zoya!

Good evening my glittery friends! So today while at the mall I discovered a store...a glorious store that had tons of brand name polishes at discounted prices! There will be a blog post on that later, but for now, I'll share what I picked up: Zoya Fleck Top Coat in Maisie! I've been wanting to try one forever, and at $6.95, why not? I did my nails to match my bathing suit for the beach tomorrow! :)


Let us get on with the glitteriness, shall we? So to start this, I put one coat of Zoya Zuza on every finger but my accent (still a bit thick, but apparently this is what happens with mini bottles, for full size bottles are fine) and a coat of Wet N' Wild Shine in Black.  Everything needed only one coat! Fabulous! So this is what everything looked like BEFORE the fleck top coat that is Maisie.


So at first I thought I'd use a darker blue, but wanted to use my Zoya Zuza instead. The Maisie flecks kinda blended in with it a bit too well, but they looked absolutely marvelous on the black! Next time I'll do an all black mani with Maisie on top! The fleck top coat when on very nicely, not thick at all, and on my black nail, I could really see it shift from blue, to green, to gold! Gloriously mesmerizing!  Here is a shot to show the color change of blue/green!


So while it added more glitter, depth, and shimmer to Zuza, it really did a number on my black nail polish! This is my first fleck, and I'm in love! I give it a 10/10 for glitter and 3D effect! I'd def buy another.  Perhaps I shall have to go to Beauty Plus Salon again!  Don't forget to go like my facebook page!


Friday, July 6, 2012

Hot Pink Cheetah Print

Good evening!  Sorry I was so M.I.A. this week, but I had work at my church's summer preschool/daycare for like 7 hours a day for 3 days, and then college stuff the other days that I had to do! Now I'm back! At first I thought I'd do a fruity design, but didn't have the time tonight due to a CPR class tomorrow! So instead I did something easy and stylish I've been thinking of for a while. Here it is! A hot pink cheetah print mani! 


So for this easy, quick mani, here's what you need! Funky Fingers in Screamin' Fuchsia, Sinful Colors in Snow Me White, and then any black striper (I used a Sinful Colors one).  I put on one nice coat of Snow Me White to make the hot pink pop! After it dried a bit, I took almost all of the polish off of my Screamin Fuchsia brush and dabbed blotches onto my nails with the tip of the brush. I let these dry a bit, so that the black would not streak with the pink. Then using my striper, I either drew 2 lines around a spot or drew a 'C' shape. Then true to a cheetah's coat, I then used the tip of my striper to put in more black spots.  I used no top coat (because I did not want to risk the black streaking on the white), and that was it! I definitely like this, and it was surprisingly easy using my left hand to paint as well! No glitter here, but def a spark of originality, and one of my favorite colors!


*Funky Fingers can be purchases at Five Below, where they are 3 for $5!!!*


Monday, July 2, 2012

Freedom Calling 4th of July Mani

Happy Early 4th of July glittery polish lovers! I recently happened upon a restock of Pretty & Polished's Etsy store, and I was able to get my hands on Freedom Calling, a marvelous red, white, and blue glitter polish! Being patriotic, I made a simple yet glittery 4th of July mani!


So to start off I used 1 coat of Sally Hansen's Double Duty Strengthening Base and Top Coat. Then I alternated on my fingers between Avon's Ruby Slipper (quickly becoming my fave shimmery red) and OPI's The Flowers are Blue-Ming! (also becoming my fave glittery blue) using only 1 coat each.  It looked very nice even without the glitter!


Look at the shimmer and glitter! Glorious! After that dried (which was roughly the time it took me to do all 5 nails), I used about 2 coats of Freedom Calling on each nail. Now I love red, white, and blue. This glitter was a clear base chock full of red, white, and blue bar, hex, dot, and square glitters! Truly wonderful! It had very easy application, and I didn't have to fish for glitter. I dabbed a bit at spots that just wouldn't get a hex, but the overall coverage was great!  I give this a 9/10 for glitter and a 9/10 for application. I'll def order from Pretty & Polished again! Then I finished with a generous coat of Sally Hansen's Double Duty Strengthening Base and Top Coat. What shine and glitter!


*Pretty & Polished products are roughly $5 for minis and roughly $10 for full size. You can find them here at her etsy store when she restocks http://www.etsy.com/shop/PrettyandPolished*